Why You Need Kick-Out Flashing to Protect the Siding on Your North Side Row House
Water damage behind siding on Pittsburgh’s North Side row houses often starts with one missing piece of flashing. Kick-out flashing, also called diverter flashing, prevents rainwater from running down your roof and into the wall cavity where it causes rot, mold, and structural damage. In Pittsburgh’s freeze-thaw climate, this small detail makes the difference between a dry wall and thousands in repair costs. EPA moisture control guidelines.
North Side row houses built between 1900 and 1940 commonly lack proper kick-out flashing where the roof meets the sidewall. The dense urban layout means rain hits your roof from multiple directions, and without diverter flashing, water funnels directly into the wall. The problem compounds when ice dams form in winter, forcing water under shingles and into gaps where kick-out flashing should be.. Read more about Dealing With Multiple Roof Levels and “Pittsburgh Step” Homes in Woods Run.
Proper installation integrates the flashing with your water-resistive barrier and siding termination, creating a continuous drainage plane. Galvanized steel kick-out flashing meets International Residential Code requirements for water diversion and resists corrosion in Pittsburgh’s wet climate better than aluminum alternatives. International Residential Code Section R905.2.8.5.
What Makes North Side Row Houses Vulnerable to Water Damage
North Side row houses share specific vulnerabilities that make kick-out flashing critical. The neighborhood’s older housing stock often features original brick veneer or wood siding that’s already weathered decades of Pennsylvania storms. Many homes sit on narrow lots where roof runoff concentrates against sidewall surfaces.
Freeze-thaw cycles in Pittsburgh cause roof materials to expand and contract, creating gaps where kick-out flashing should direct water away. Without it, melting snow seeps behind siding and refreezes, forcing moisture deeper into wall cavities. The problem accelerates in spring when heavy rains overwhelm compromised areas.
Common siding types in the North Side include vinyl, fiber cement, and original wood clapboard. Each material reacts differently to trapped moisture, but all suffer when water penetrates behind the surface. Vinyl can warp and buckle, fiber cement can delaminate, and wood rots from the inside out.
Local building patterns compound the risk. Row houses share walls, so water damage in one unit can affect adjacent properties. The North Side’s historic districts also mean many homes have limited exterior modification options, making proper initial installation crucial.
How Water Enters Walls Without Proper Kick-Out Flashing
Water follows the path of least resistance. When roof runoff reaches the sidewall without kick-out flashing, it flows down the wall surface and into gaps between siding and trim. In brick veneer construction common in older North Side homes, water penetrates mortar joints and weeps into the wall cavity.
The process accelerates during wind-driven rain typical of Pittsburgh spring storms. Rain hits the roof at an angle, creating sheets of water that would normally be diverted by kick-out flashing. Without it, water sheets directly down the wall face, finding every nail hole, seam, and gap.
Inside the wall, moisture encounters insulation, wood framing, and drywall. Wood framing absorbs water like a sponge, expanding and losing structural integrity. Insulation becomes compressed and loses R-value. Drywall wicks moisture upward, creating visible stains and promoting mold growth within 24-48 hours.
The damage often remains hidden until catastrophic failure occurs. By the time you notice peeling paint or siding deterioration, the wall cavity may already contain extensive rot and mold colonies that require complete reconstruction.
Step-by-Step Professional Kick-Out Flashing Installation
- Remove Existing Shingles and Underlayment
Technicians carefully remove shingles from the roof-wall intersection, exposing the roof deck and existing underlayment. This allows inspection of the deck for rot and ensures proper flashing integration.
- Install Ice and Water Shield
Apply ice and water shield membrane extending at least 24 inches up the sidewall and across the roof deck. This self-adhering membrane provides secondary protection against ice dam penetration.
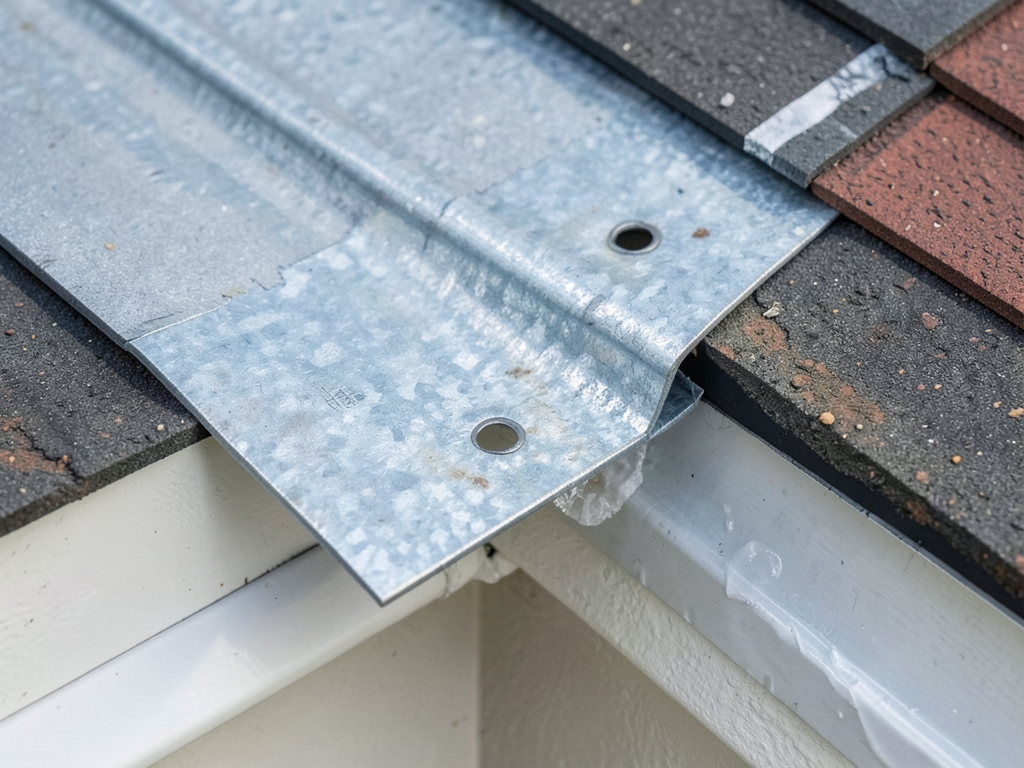
- Form and Position Kick-Out Flashing
Custom-form galvanized steel flashing to create a 110-degree angle that directs water away from the wall. The vertical leg extends 4-6 inches up the sidewall, while the horizontal leg extends 4 inches onto the roof deck.
- Integrate with Water-Resistive Barrier
Install house wrap or building paper over the vertical leg of the flashing, creating a shingled effect that directs water outward. Overlap upper courses over lower courses to maintain drainage continuity.
- Install Step Flashing
Place step flashing pieces alternating with shingles up the roof slope. Each piece overlaps the previous one and extends under the shingle above, creating a watertight stair-step pattern.
- Apply Sealant and Complete Installation
Apply polyurethane sealant between the flashing and sidewall, avoiding caulk which can fail prematurely. Install siding or trim to complete the weather barrier, ensuring all joints shed water outward.
Materials and Code Requirements for Pittsburgh Installations
International Residential Code Section R905.2.8.5 requires kick-out flashing where a roof terminates against a sidewall. The code mandates flashing that extends up the sidewall and directs water away from the wall surface. Pittsburgh’s PLI (Permits, Licenses, and Inspections) department enforces these requirements during roofing permits. Why Metal Roofing is Becoming the Top Choice for Homes in North Hills.
Material selection matters in Pittsburgh’s climate. Galvanized steel offers superior corrosion resistance compared to aluminum, which can pit and deteriorate in acidic rain conditions common near industrial areas. Copper provides excellent longevity but costs significantly more and may not be necessary for residential applications.
Thickness specifications matter for durability. Sixteen-gauge galvanized steel provides adequate strength for most residential applications while remaining workable for field forming. Thinner materials can deform during installation or fail under snow loads common in Pittsburgh winters.
Fastener selection impacts long-term performance. Stainless steel or hot-dipped galvanized nails resist corrosion better than standard fasteners. Placement should avoid creating water entry points, with fasteners driven into solid framing members rather than sheathing alone.
Common Installation Mistakes That Lead to Failure
Incorrect flashing angle represents the most frequent error. Flashing set at less than 100 degrees fails to adequately divert water, while angles over 120 degrees can create water dams. The ideal 110-degree angle balances water diversion with structural integrity.
Improper overlap sequences cause systematic failures. Step flashing must alternate with shingles in a shingled pattern, with upper pieces overlapping lower ones. Reversed sequences trap water against the wall instead of shedding it outward.
Relying solely on caulk instead of mechanical integration creates temporary fixes that fail within years. Caulk deteriorates from UV exposure and temperature cycling, while properly integrated flashing systems last the life of the roof when installed correctly.
Neglecting to integrate with the water-resistive barrier creates weak points. House wrap must be installed shingle-style over kick-out flashing, not behind it. This detail ensures water flows over the flashing rather than behind it.
Using pre-formed kick-out flashing without field modification often results in poor fit. Custom-forming flashing on-site allows technicians to match exact roof pitches and sidewall configurations, ensuring optimal water diversion.
Cost Analysis: Prevention vs. Repair
Professional kick-out flashing installation costs between $300-600 for typical residential applications, depending on roof complexity and accessibility. This investment prevents damage that can cost $5,000-15,000 to repair when walls require reconstruction due to rot and mold.. Read more about Why Your New Roof Needs a Drip Edge to Prevent Rotting Fascia in Whitehall.
Insurance coverage often excludes gradual water damage, meaning homeowners bear the full cost of repairs. Water damage from failed flashing typically develops over years, falling outside sudden-damage coverage provisions in most policies.
Energy efficiency impacts compound the financial equation. Water-damaged walls lose insulation effectiveness, increasing heating and cooling costs. A compromised wall cavity can reduce R-value by 30-50%, adding hundreds annually to utility bills.
Property value depreciation represents another hidden cost. Visible water damage or the need for wall reconstruction significantly reduces home values and complicates sales transactions when discovered during inspections.
Maintenance and Inspection Guidelines
Annual inspections identify flashing problems before they cause damage. Look for separated sealant joints, rusted flashing, or missing pieces. Pay special attention after severe storms or winter freeze-thaw cycles that can stress flashing connections.
Visual inspection from ground level reveals many problems. Look for water stains on siding below roof-wall intersections, warped or missing kick-out flashing, or debris accumulation that indicates water diversion failure.
Professional inspections every 2-3 years catch issues homeowners miss. Technicians use moisture meters to detect hidden water accumulation and infrared cameras to identify temperature variations indicating moisture intrusion.
Seasonal maintenance prevents minor issues from becoming major problems. Clean debris from roof-wall intersections, check sealant integrity, and ensure downspouts direct water away from foundation areas where it could back up against walls.
Call (878) 209-5522 Today to Schedule Your Inspection
Don’t wait for water damage to appear. North Side row houses need proper kick-out flashing to withstand Pittsburgh’s harsh climate. Our technicians inspect existing flashing, identify vulnerabilities, and install code-compliant systems that protect your home for decades.
Pick up the phone and call (878) 209-5522 before the next storm hits. We serve all North Side neighborhoods including Manchester, Troy Hill, and Allegheny West. Same-week appointments available for urgent cases where water damage is already occurring.
Frequently Asked Questions
How long does kick-out flashing installation take?
Most residential installations require 2-4 hours for a single roof-wall intersection. Complex configurations or difficult access may extend the timeframe, but we complete most jobs within one service visit.
Can I install kick-out flashing myself?
DIY installation often fails due to improper integration with existing roofing and siding systems. Professional installation ensures code compliance and proper integration with water-resistive barriers that DIYers typically miss. Roofing Scranton.
What signs indicate my home needs new kick-out flashing?
Water stains on siding, peeling paint below roof-wall intersections, and visible gaps where flashing should be present are key indicators. Musty odors inside near exterior walls also suggest moisture intrusion.
Does insurance cover kick-out flashing installation?
Standard policies typically don’t cover flashing installation as preventive maintenance. However, if water damage from failed flashing has already occurred, some policies may cover repair costs minus the deductible.
You may also find this helpful. Managing the Logistics of a Roof Replacement on the Narrow Streets of the South Side Flats.
{
“@context”: “https://schema.org”,
“@type”: “BlogPosting”,
“headline”: “Why You Need Kick-Out Flashing to Protect the Siding on Your North Side Row House”,
“description”: “Protect your North Side row house from costly water damage. Learn why kick-out flashing is essential for Pittsburgh’s freeze-thaw climate and how we install it right.”,
“wordCount”: 1628,
“datePublished”: “2026-05-08T07:20:00.000Z”,
“dateModified”: “2026-05-08T07:20:00.000Z”,
“inLanguage”: “en-US”,
“mainEntityOfPage”: {
“@type”: “WebPage”,
“@id”: “https://victoryroofingpittsburgh.com”
},
“publisher”: {
“@type”: “LocalBusiness”,
“name”: “Victory Roofing Pittsburgh”,
“url”: “https://victoryroofingpittsburgh.com”
},
“author”: {
“@type”: “Organization”,
“name”: “Victory Roofing Pittsburgh”,
“url”: “https://victoryroofingpittsburgh.com”
},
“image”: {
“@type”: “ImageObject”,
“url”: “https://victoryroofingpittsburgh.com/wp-content/uploads/2026/03/why-you-need-kick-out-flashing-to-protect-the-sidi-1.png”
}
}
{
“@context”: “https://schema.org”,
“@type”: “RoofingContractor”,
“name”: “Victory Roofing Pittsburgh”,
“url”: “https://victoryroofingpittsburgh.com”,
“address”: {
“@type”: “PostalAddress”,
“addressLocality”: “Pittsburgh”
},
“areaServed”: {
“@type”: “City”,
“name”: “Pittsburgh”
}
}
{
“@context”: “https://schema.org”,
“@type”: “FAQPage”,
“mainEntity”: [
{
“@type”: “Question”,
“name”: “How long does kick-out flashing installation take?”,
“acceptedAnswer”: {
“@type”: “Answer”,
“text”: “Most residential installations require 2-4 hours for a single roof-wall intersection. Complex configurations or difficult access may extend the timeframe, but we complete most jobs within one service visit.”
}
},
{
“@type”: “Question”,
“name”: “Can I install kick-out flashing myself?”,
“acceptedAnswer”: {
“@type”: “Answer”,
“text”: “DIY installation often fails due to improper integration with existing roofing and siding systems. Professional installation ensures code compliance and proper integration with water-resistive barriers that DIYers typically miss. Roofing Scranton.”
}
},
{
“@type”: “Question”,
“name”: “What signs indicate my home needs new kick-out flashing?”,
“acceptedAnswer”: {
“@type”: “Answer”,
“text”: “Water stains on siding, peeling paint below roof-wall intersections, and visible gaps where flashing should be present are key indicators. Musty odors inside near exterior walls also suggest moisture intrusion.”
}
},
{
“@type”: “Question”,
“name”: “Does insurance cover kick-out flashing installation?”,
“acceptedAnswer”: {
“@type”: “Answer”,
“text”: “Standard policies typically don’t cover flashing installation as preventive maintenance. However, if water damage from failed flashing has already occurred, some policies may cover repair costs minus the deductible.”
}
}
]
}
{
“@context”: “https://schema.org”,
“@type”: “HowTo”,
“name”: “How to Install Kick-Out Flashing”,
“step”: [
{
“@type”: “HowToStep”,
“position”: 1,
“name”: “Remove Existing Shingles and Underlayment”,
“text”: “Technicians carefully remove shingles from the roof-wall intersection, exposing the roof deck and existing underlayment. This allows inspection of the deck for rot and ensures proper flashing integration.”
},
{
“@type”: “HowToStep”,
“position”: 2,
“name”: “Install Ice and Water Shield”,
“text”: “Apply ice and water shield membrane extending at least 24 inches up the sidewall and across the roof deck. This self-adhering membrane provides secondary protection against ice dam penetration.”
},
{
“@type”: “HowToStep”,
“position”: 3,
“name”: “Form and Position Kick-Out Flashing”,
“text”: “Custom-form galvanized steel flashing to create a 110-degree angle that directs water away from the wall. The vertical leg extends 4-6 inches up the sidewall, while the horizontal leg extends 4 inches onto the roof deck.”
},
{
“@type”: “HowToStep”,
“position”: 4,
“name”: “Integrate with Water-Resistive Barrier”,
“text”: “Install house wrap or building paper over the vertical leg of the flashing, creating a shingled effect that directs water outward. Overlap upper courses over lower courses to maintain drainage continuity.”
},
{
“@type”: “HowToStep”,
“position”: 5,
“name”: “Install Step Flashing”,
“text”: “Place step flashing pieces alternating with shingles up the roof slope. Each piece overlaps the previous one and extends under the shingle above, creating a watertight stair-step pattern.”
},
{
“@type”: “HowToStep”,
“position”: 6,
“name”: “Apply Sealant and Complete Installation”,
“text”: “Apply polyurethane sealant between the flashing and sidewall, avoiding caulk which can fail prematurely. Install siding or trim to complete the weather barrier, ensuring all joints shed water outward.”
}
],
“image”: “https://victoryroofingpittsburgh.com/wp-content/uploads/2026/03/why-you-need-kick-out-flashing-to-protect-the-sidi-1.png”
}
{
“@context”: “https://schema.org”,
“@type”: “BreadcrumbList”,
“itemListElement”: [
{
“@type”: “ListItem”,
“position”: 1,
“name”: “Home”,
“item”: “https://victoryroofingpittsburgh.com”
},
{
“@type”: “ListItem”,
“position”: 2,
“name”: “Blog”,
“item”: “https://victoryroofingpittsburgh.com/blog”
},
{
“@type”: “ListItem”,
“position”: 3,
“name”: “Why You Need Kick-Out Flashing to Protect the Siding on Your North Side Row House”
}
]
}
{
“@context”: “https://schema.org”,
“@type”: “Service”,
“serviceType”: “Roofing”,
“provider”: {
“@type”: “LocalBusiness”,
“name”: “Victory Roofing Pittsburgh”,
“url”: “https://victoryroofingpittsburgh.com”
},
“areaServed”: {
“@type”: “City”,
“name”: “Pittsburgh”
},
“description”: “Protect your North Side row house from costly water damage. Learn why kick-out flashing is essential for Pittsburgh’s freeze-thaw climate and how we install it right.”
}